The Secret to Getting a .com.np Website for FREE

Are you a Nepalese? Did you know you can get your own .np domain website for FREE using just three tools? A lot of my friends from tech backgrounds already know this, but you don’t have to be a techie to have your own digital presence using .np domain. Just follow a few easy steps (which I’ll go through), and you’ll have your own yourname.com.np domain live on the internet.
Things to Know Before You Start
What is .np?
- .np is Nepal’s country code top-level domain
- just like .us is for the United States .uk is for the United Kingdom
Unlike most other countries that charge for domains, Nepal provides .com.np, .org.np, .edu.np, etc., for free through the official registrar, Mercantile Communications.
Who is eligible for a .np domain?
- Individuals: Must be a Nepali citizen with a valid citizenship ID.
- Organizations: Must be registered in Nepal.
- Educational Institutions: Must be registered with the Ministry of Education.
- Government Bodies: Must be registered with the government.
- Foreigners: Can apply for .com.np domains if they have a registered business in Nepal.
- Non-profits: Can apply for .org.np domains.
- Commercial entities: Can apply for .com.np domains.
- Educational institutions: Can apply for .edu.np domains.
- Other entities: Can apply for .net.np, .info.np, and other second-level domains.
- Note: You can’t get a .np domain if you’re not a Nepali citizen or don’t have a registered organization in Nepal.
Some Terminologies
Trust me, you don’t need to know all the techy stuff. But here are a few terms that will help you understand the process better.
What is Domain Name Server (DNS)?
Let’s say you’ve registered yourname.com.np, now the internet needs to know where to find your website. DNS works like a phonebook: when someone types yourname.com.np, DNS translates it into an IP address like 104.21.42.145 to locate your website. Without DNS, we’d all be typing numbers instead of names. You’ll use a DNS Provider (like Cloudflare) to connect your domain to your GitHub Pages site.
What is a server?
A server is a computer that stores your website files and makes them accessible to the internet. When someone types your domain name, the server sends the website files to their browser. We’ll use github as our server.
| Term | Example | What It Does |
|---|---|---|
| Domain | yourname.com.np | Your website’s name (the address) |
| DNS | yourname.com.np → 104.21.x.x | Translates the domain into IP address |
| Server | GitHub Pages | Stores and serves your website files |
| Browser | Chrome, Safari, Firefox | Displays the website to visitors |
Tools You’ll Use
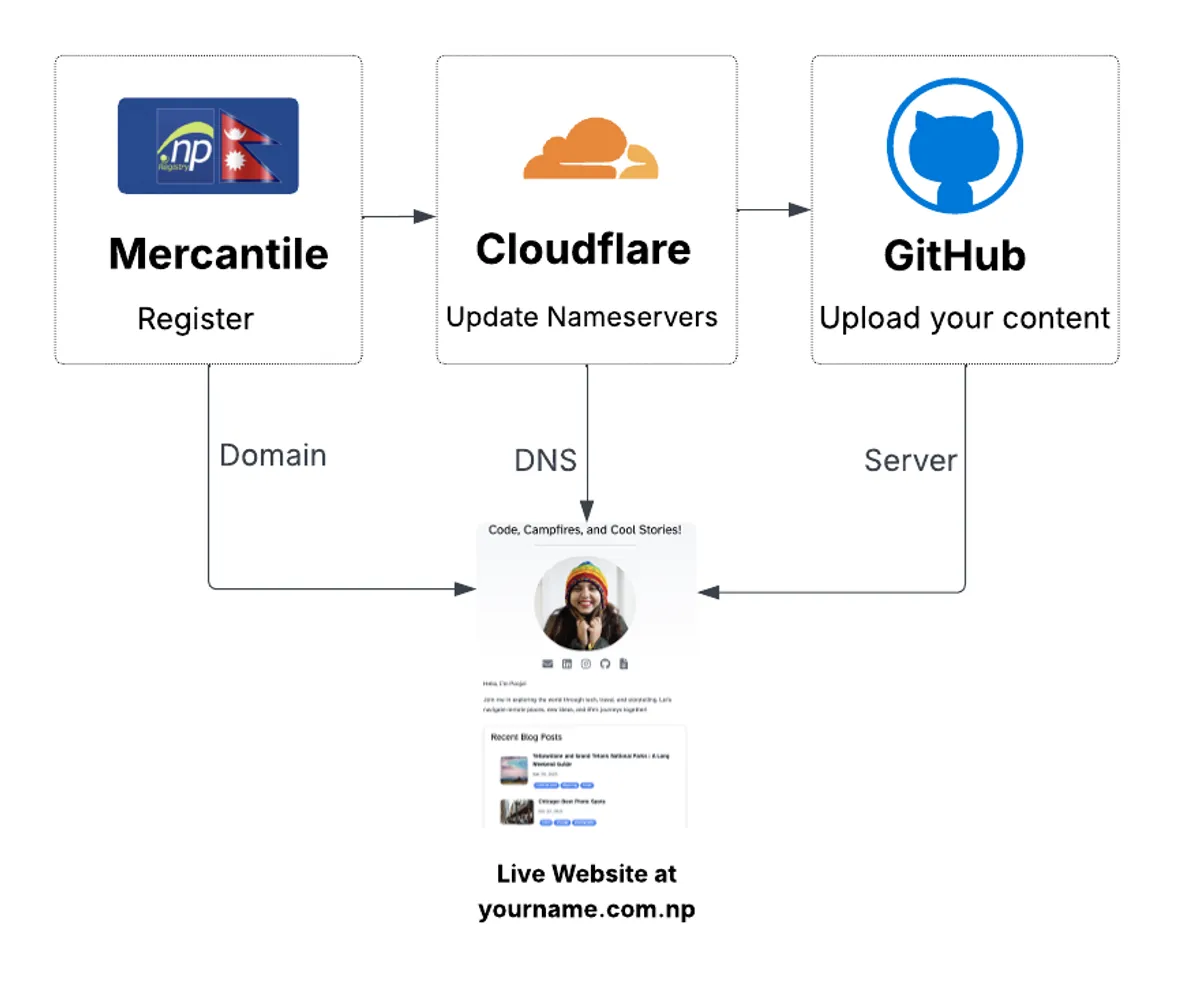
1. Mercantile (https://register.com.np)
- What it does: Gives you your domain name (like
yourname.com.np) — for free. - You can have any variation of your name, in any order or just the letters you prefer.
- Think of it as: The office where you claim your digital land.
- You submit an application (with a citizenship ID), and they approve your domain.
2. Cloudflare (https://cloudflare.com)
- What it does: Handles your DNS — connects your domain name to your website.
- Bonus: It also gives your site security and speed optimizations.
- Think of it as: The one making sure your digital address leads people to the right house (your site).
3. GitHub (https://github.com)
- What it does: Hosts your website files — for free.
- You upload your HTML, CSS, or Jekyll-based site - and can upload it anytime .
- Think of it as: The actual house — where your website lives on the internet.
Now, lets get started with the setup.
Step-by-Step Setup
Step 1: Register Your .com.np Domain with Mercantile
-
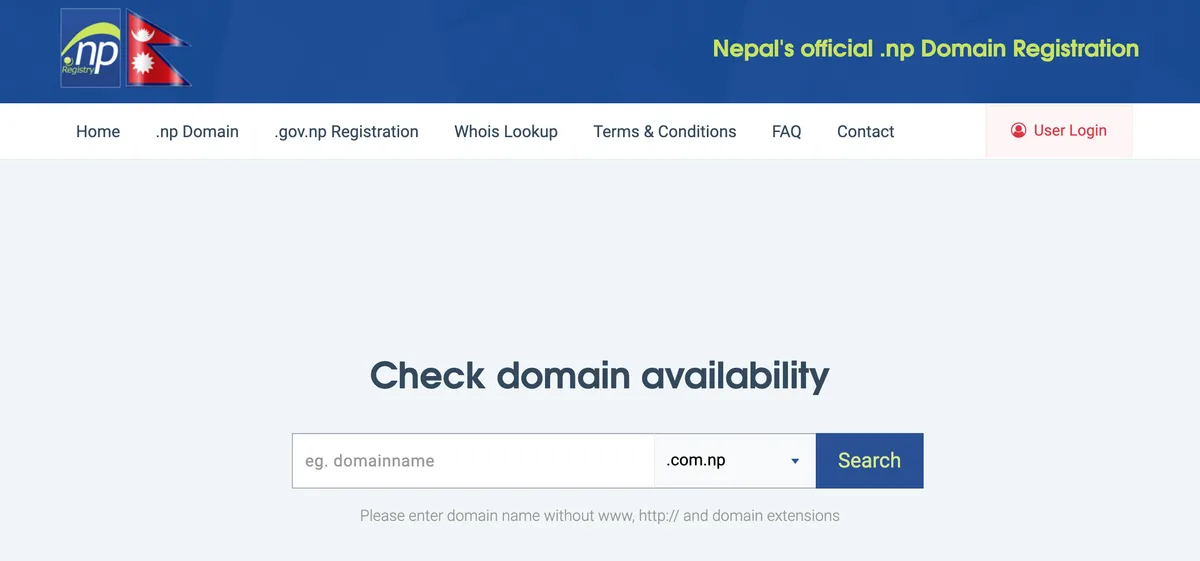
Go to https://register.com.np
-
Search for the domain you want (e.g.,
yourname.com.np)- Make sure it’s available
- This is the name you want to use for your website, so if you are buolding your personal website, use your name.
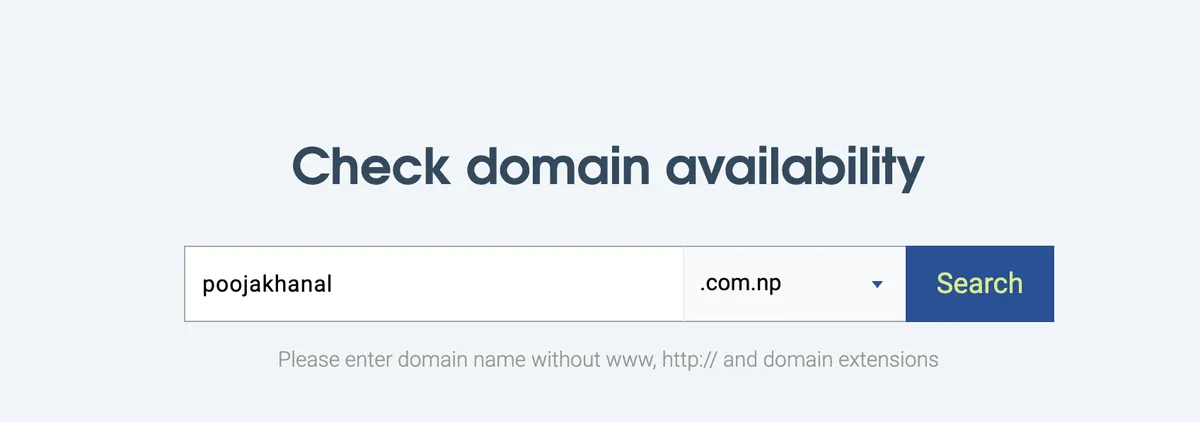
Check domain availability -
Create an account and fill out the application
-
Upload:
- A scanned copy of your Nepali citizenship
- A cover letter (optional but recommended)
-
Submit and wait for approval (usually 1–3 business days)
-
Once approved, you’ll get an email with your domain details
Step 2: Create a Cloudflare Account
- Go to https://cloudflare.com and sign up
- Go to Add -> Connect a Domain and enter your new domain (e.g.,
yourname.com.np) - Let Cloudflare scan your domain and click Continue
-
Choose the Free Plan
-
Cloudflare will give you two nameservers (e.g.,
nina.ns.cloudflare.com,kurt.ns.cloudflare.com)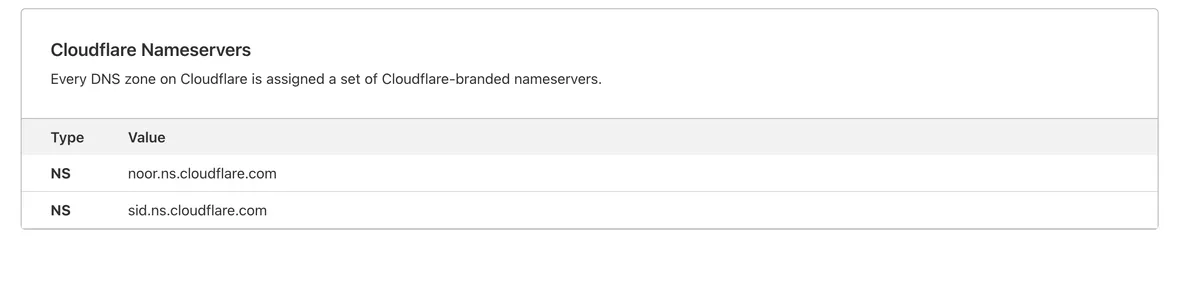
Cloudflare nameservers -
Copy these nameservers — you’ll need them in the next steps.
Step 3: Update Nameservers on Mercantile
- Once your domain is approved from Marcantile, log in to https://register.com.np
- Go to your domain dashboard
- Edit your domain’s nameservers
- Replace the default nameservers with the Cloudflare ones
- Save and wait for DNS propagation (a few hours to 24 hrs)
Step 4: Set Up Your Website on GitHub Pages
Step 4.1: Create a GitHub Account
- Go to https://github.com
- Sign up for a free account
Step 4.2: Use a Website Template by Forking
-
Go to a free template repository like: https://github.com/StartBootstrap/startbootstrap-clean-blog
-
Click the “Fork” button (top right) to copy it to your GitHub
-
After forking, go to Settings > Rename, and change the repo name to: yourname.github.io
-
Go to Settings > Pages
-
Set the Source to: Branch: main Folder: / (root)
-
Click Save
-
Your website will be live at: https://yourname.github.io
Step 4.3: (Alternative) Upload Your Own Files
-
Create a new public repository named: yourname.github.io
-
Add your website files (HTML/CSS or a Jekyll site)
-
Go to Settings > Pages
-
Under “Source”, choose: Branch: main Folder: / (root)
-
Click Save — your site will now be live at yourname.github.io
Step 5 : Copy the IPs from GitHub
- Go to your GitHub repository (yourname.github.io)
- Go to Settings > Pages
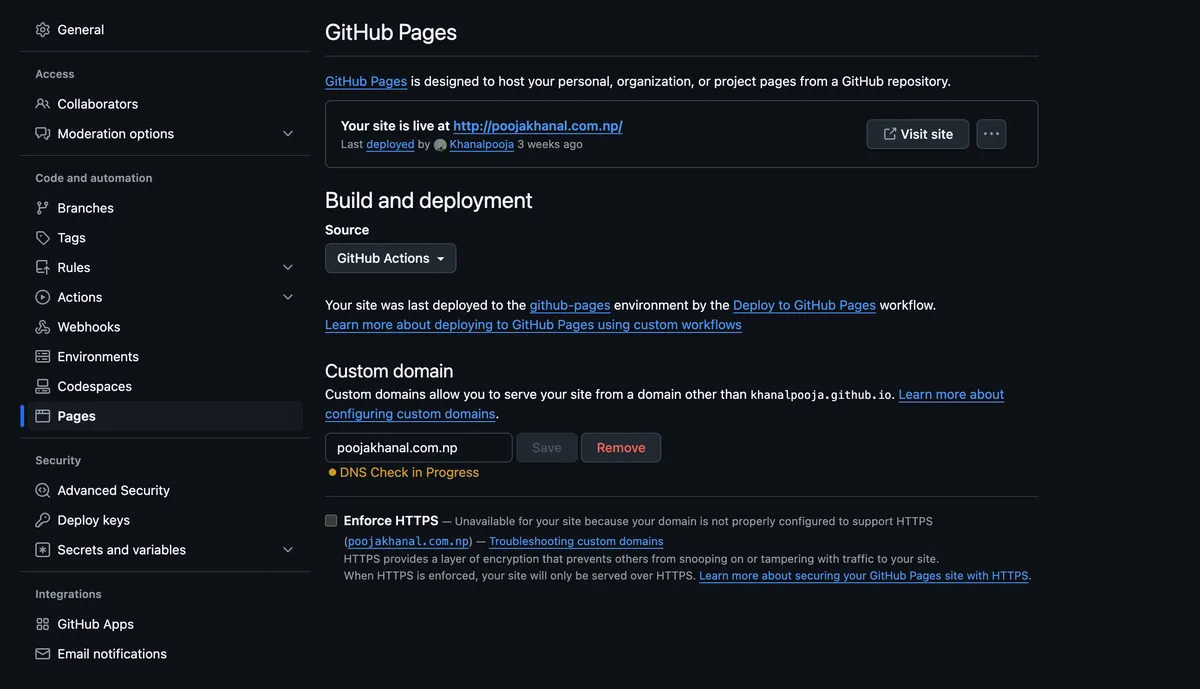
-
Under Custom Domain, enter your domain (e.g.,
www.yourname.com.np) -
Click Save
-
GitHub will automatically create a CNAME file in your repository
-
You will see 4 ips for A records. and Another 4 for AAAA records.
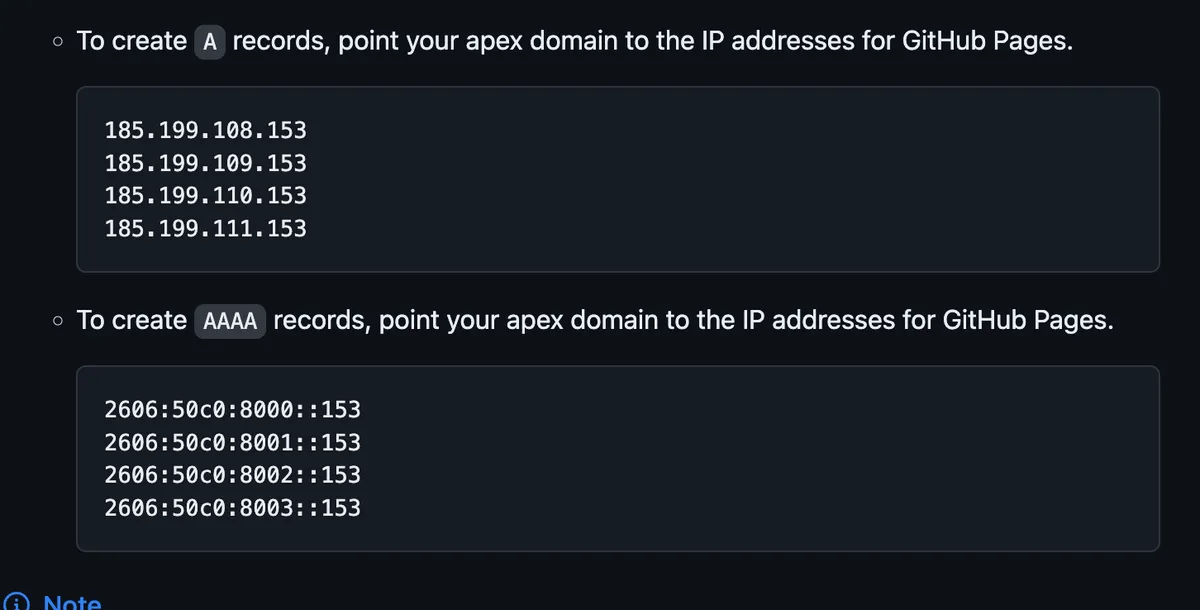
Add DNS records -
Copy these IPs
Step 6: Link Your Domain to GitHub via Cloudflare
- In Cloudflare, go to DNS > Records
- Add records:
| Type | Name | Target | TTL | Proxy Status |
|---|---|---|---|---|
| CNAME | www | yourname.com.np | Auto | Proxied (orange) |
| A | yourname.com.np | <IP from GitHub> | Auto | Proxied (orange) |
| A | yourname.com.np | <IP from GitHub> | Auto | Proxied (orange) |
| A | yourname.com.np | <IP from GitHub> | Auto | Proxied (orange) |
| A | yourname.com.np | <IP from GitHub> | Auto | Proxied (orange) |
| AAAA | yourname.com.np | <IP from GitHub> | Auto | Proxied (orange) |
| AAAA | yourname.com.np | <IP from GitHub> | Auto | Proxied (orange) |
| AAAA | yourname.com.np | <IP from GitHub> | Auto | Proxied (orange) |
| AAAA | yourname.com.np | <IP from GitHub> | Auto | Proxied (orange) |
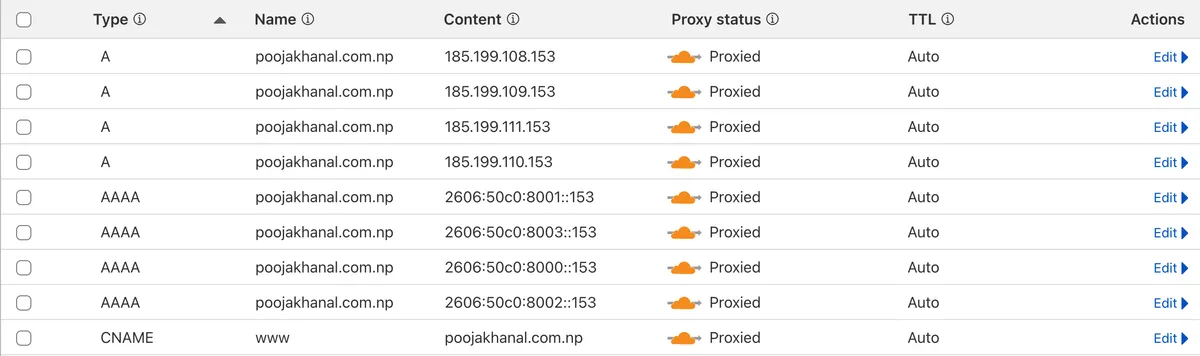
- Click Save
That’s it. You now have a fully working .com.np website and domain — and you didn’t spend a single rupee.
Conclusion
Your digital identity is now live! Now, you can build your portfolio, blog or share your thoughs with the world.